Domotizing a Linky, Itron, Landis+Gyr meter : ESP32 PoE vs Zigbee LiXee ZLinky
Electricity meters fitted with a Customer Tele-Information (TIC, “Télé-Information Client”) output let you retrieve consumption data in real time and integrate it into a home-automation system like Home Assistant. Whether you own an older Itron electronic meter or a recent Linky, the connectivity exists; you still have to choose the right integration method.
After experimenting with different approaches to connect several Itron ITE411L3H2 and Landis+Gyr L30C5 G3 (three-phase) meters to Home Assistant Green, two solutions clearly emerge: one wired and robust, the other wireless and economical. This article details the two approaches, their respective advantages, and the technical choices behind them.
Understanding the TIC output
The Télé-Information Client output is a French standard present on virtually every electronic meter since the 2000s. Through two terminals (I1 and I2) it transmits a serial signal modulated at 50 kHz containing:
- The consumption indexes (peak hours, off-peak hours, etc.)
- The instantaneous power and the current per phase
- The contract number and the tariff option
- The exceedances of the subscribed power
The TIC signal works in historical mode (1200 baud) or standard mode (9600 baud for Linky meters). In both cases, it needs a demodulation circuit to be usable by a microcontroller.
Solution 1: The wired approach with the ESP32-PoE-ISO
Technical architecture
The wired solution rests on three main components:
- Olimex ESP32-PoE-ISO: an ESP32 board with Ethernet PoE and 3000V galvanic isolation
- Charles Hallard’s EthTInfo shield: a ready-to-use TIC demodulation circuit
- PoE Ethernet port: to power and connect the module to the network
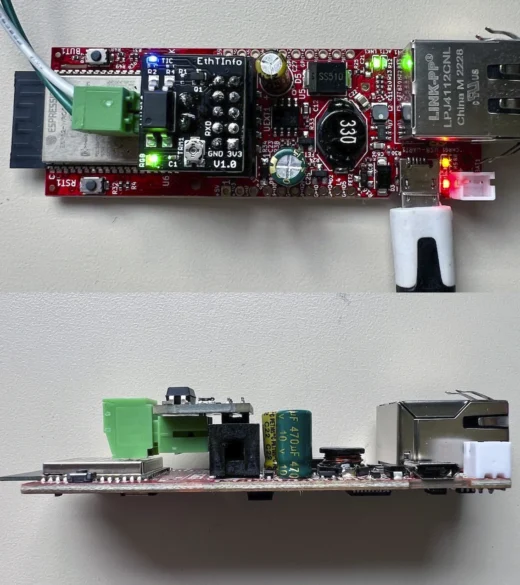
The meter has its own ESP32-PoE-ISO module fitted with the EthTInfo shield. The module connects to the meter via two wires (I1/I2) for the data, and to the network via an RJ45 Ethernet cable that simultaneously provides PoE power and network connectivity. Note that if you have several electricity meters to “domotize”, you’ll need as many modules as meters.
Why the ESP32-PoE-ISO and not another version?
Olimex offers several variants of ESP32 boards with Ethernet PoE. The choice of the ESP32-PoE-ISO isn’t trivial:
ESP32-PoE (standard version with no isolation): To be absolutely avoided. The absence of galvanic isolation creates risks of ground loops when several meters are connected. Programming the board via USB while it’s powered by PoE can damage the hardware. Olimex states it clearly in the documentation: unplug the Ethernet before any USB connection.
ESP32-PoE-ISO (version with 3000V isolation): The right choice. The galvanic isolation eliminates the risks of ground loops even with ten meters connected simultaneously. You can program the board over USB while keeping PoE plugged in, which considerably simplifies maintenance. For a production installation where reliability comes first, it’s the obvious option.
ESP32-PoE2 (improved version with no isolation): Tempting on paper with its 16 MB of Flash and 8 MB of PSRAM, but unsuited to our use. The absence of galvanic isolation remains the blocking point. For tele-information, we’ll never use more than 10% of the ISO version’s 4 MB of Flash; Tasmota or ESPHome with teleinfo support weighs less than a megabyte. Paying more for specifications you’ll never use makes no sense.
The EthTInfo shield: an optimized optocoupler
Charles Hallard’s EthTInfo shield is worth dwelling on. It’s essentially a professional teleinfo demodulation circuit on a PCB, ready to slot onto the ESP32-PoE via the UEXT connector. Charles Hallard is an essential reference in the field of tele-information in France, and his blog is full of detailed technical articles on the subject.
At the heart of the shield sits an LTV-814 optocoupler, superior to the classic SFH620A found in DIY builds. Charles Hallard documented his comparative tests on his blog: the LTV-814 switches faster, requires less input current, and produces a cleaner output signal. In practice, this translates into better decoding reliability, particularly with ESP32s, which can be finicky about logic levels.
The shield also integrates the optimal biasing resistors (R1 to limit the current in the optocoupler’s LED, R2 for the pull-up) and screw terminals to connect the meter’s I1/I2 wires directly. You could certainly build this circuit for €3 to €5 of components, but for a production installation, the €25-30 of the assembled and tested shield represents a considerable time saving and a guarantee of operation.
The fit onto the ESP32-PoE is direct via the UEXT connector: no soldering, no risky wiring. The demodulated signal arrives cleanly on the ESP32’s GPIO36, ready to be processed by Tasmota or ESPHome with auto-configuration.
Budget and installation
For one meter in the wired solution: ESP32-PoE-ISO (€30) + BOX-ESP32-POE-F (€10) + EthTInfo shield (€10) + cables/wires (€7), so about €57 incl. VAT, excl. shipping.
The installation requires running an Ethernet cable from your PoE network equipment (switch, PoE injector, or compatible box) to the meter, but once in place, the system is fully autonomous. Each ESP32 module works independently, with no single point of failure. An ESP32-PoE-ISO module consumes about 0.7 W in normal operation, which lets a standard PoE switch power several dozen of them without difficulty.
The Tasmota or ESPHome firmware integrates natively with Home Assistant via MQTT auto-discovery or API. No complex manual configuration: you flash the firmware once, the rest happens automatically.
Beyond electricity: The ESP32-PoE-ISO isn’t limited to electrical tele-information. Without the EthTInfo shield, it can directly read the pulses of other meters such as water-meter transmitters (IZAR PULSE grafted onto a Diehl ALTAIR V5, for example). A GPIO configured as an interrupt is enough to count the pulses and transmit the data via MQTT or the Home Assistant API. For about €32, it’s a robust wired solution to unify the monitoring of all your meters on the same PoE infrastructure. Bringing water meters into home automation may be the subject of a future article.
Solution 2: The wireless approach with Zigbee
The LiXee ZLinky_TIC
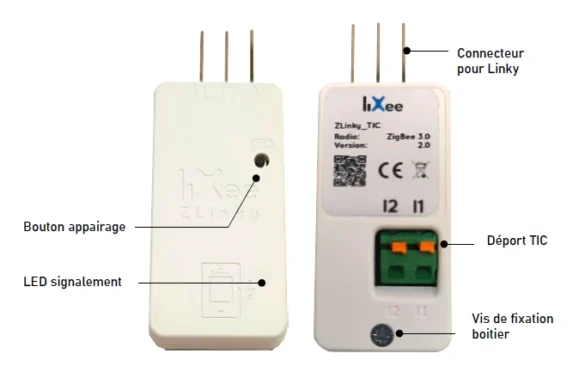
For those who favor ease of installation at the cost of a slight loss of robustness, the Zigbee solution with the LiXee ZLinky_TIC v2 deserves consideration.
The v2 of the ZLinky_TIC has clearly gained in reliability and ergonomics. The new ABS enclosure is more robust, a remote terminal block lets you daisy-chain several TIC modules, and the v16 firmware (available via OTA) brings better stability with fault detection and optimized management of the router/limited modes. Warning: avoid the v15 version, which had problems with counters resetting to zero; go straight to v16. User feedback is generally excellent, with 5/5 ratings on most stores and a smooth ZHA/Zigbee2MQTT integration.
The ZLinky is a compact module that connects directly to the meter’s I1/I2 terminals and communicates via Zigbee 3.0. The major advantage: it powers itself directly through the meter’s tele-information signal. No need for an external power supply, no network cable to run. You screw two wires onto I1 and I2, you pair the module with Home Assistant’s Zigbee coordinator, and you’re done.
This self-powering capability is explained by the very low consumption of the Zigbee module (10 to 20 mA) compared to the 120-150 mA of an ESP32 with Ethernet active. The TIC signal provides just enough power to run a frugal Zigbee chip, but not a power-hungry processor like the ESP32.
Budget and installation
For one meter in Zigbee: LiXee ZLinky_TIC (€49) + short I1/I2 cables (€2), so about €51 incl. VAT, excl. shipping.
To this is added the USB Zigbee coordinator (Sonoff ZBDongle-E at €35) if you don’t already have one for your home-automation setup. If you already have a working Zigbee network, the cost is limited to the ZLinky module itself.
Limitations of wireless
The Zigbee network works in mesh mode: each module can serve as a router to extend the range. With several modules spread across the installation, the mesh can prove robust. Nonetheless, a few points to watch:
Limited TIC current: Some Linky meters (depending on the manufacturer) provide a supply current just sufficient for the ZLinky. In those cases, the “limited” firmware disables the Zigbee router function to reduce consumption. The majority of installations work without a problem in router mode, but it’s good to know. The remote TIC terminal block theoretically allows daisy-chaining several devices on the I1/I2 terminals, but the power remains limited: favor a single self-powered ZLinky per meter, with the other daisy-chained devices needing their own power source.
Network density: If you install several Zigbee modules on the same installation, the load on the coordinator increases proportionally. Depending on the physical topology and 2.4 GHz interference (WiFi, microwave ovens), latencies can appear with a large number of modules.
Relative reliability: A wireless network remains inherently less predictable than a wired link. Interference, metal obstacles, or simply a failure of the coordinator can disrupt the whole system. For non-critical electrical monitoring, that’s acceptable. For real-time control or applications where availability is crucial, wired remains preferable.
Single point of failure: If the Zigbee coordinator fails, all the meters connected via Zigbee go silent simultaneously. With the wired solution, each ESP32 is autonomous.
Conclusion: choosing according to your priorities
These two approaches answer different needs. The wired ESP32-PoE-ISO solution favors robustness, the autonomy of each module, and no compromise on reliability. It’s a durable infrastructure that demands a higher initial investment but guarantees constant performance.
The Zigbee solution optimizes simplicity, at the price of a dependence on the wireless network and its coordinator. For a classic home installation, it’s amply sufficient and much faster to deploy.
In the case of an installation with several electricity meters to integrate, the choice may fall on the wired solution if the Ethernet network infrastructure already exists and the reliability of the electrical monitoring is a priority.
But for someone starting from scratch, who has only one or two meters to connect, and who favors speed of installation, going with Zigbee is an excellent decision. Especially if a Zigbee network is already in place for other home-automation devices.
Customer tele-information remains a robust standard that lets you take back control over your consumption data. Whether you choose the wired or the wireless route, the key is to favor proven components (Olimex, Charles Hallard, LiXee) rather than cobbled-together solutions whose long-term reliability remains uncertain.
To go further or get help on these solutions, the French-speaking community forum run by Charles Hallard is a valuable resource with plenty of field feedback and technical advice.